The Best Way to Empty an Ileostomy Bag
Now that you know how to change and attach a bag, let’s have a look at how you can empty it effectively. Recounting to the first day at home, I worked out the bones of an efficient scheme that allowed me to empty my ileostomy bag with efficiency and without any leakage. While in the hospital, I had been told very little and was shown how to empty the bag by the staff nurse on the ward just once. And this too had been done with me lying flat on my back. The rest of what I had learnt, I had worked out through trial and error myself. Fortunately, this was mostly trial and modification rather than trial and error. Like everyone else, I did have my series of errors and disasters which became more frequent as I recovered and ate more, ate later in the evening and consumed different kinds of foods.
I also found out through trial and error which foods to avoid, particularly in the evenings. Those foods included milk, yoghurt and other dairy products like cheese fondue, chocolate, and even Christmas pudding. Large meals, late meals and meals eaten late night were also on the ‘to avoid’ list. The large and late meals increase the volume of the effluent flowing into the bag overnight. As for late night meals, they made me feel sluggish and made me sleep more deeply. This caused me to turn over and stay asleep rather than getting up and emptying the bag in the middle of the night. These are all things which may catch you out in the nick of time!
- Make friends with your toilet and toilet bowl.
In order to empty an ileostomy bag without splashing and having to clear up the mess, one needs to get close and friendly with the toilet bowl. This much is something that can’t be avoided in the least. I understand that it might sound disgusting and weird, but doing that will save you a lot of trouble. You have my word! This will be infinitely easier to do if the toilet is spotlessly clean, disinfected, and odourless. I was very fortunate as I have a house with 2 bathrooms. Therefore, I was able to reserve one toilet solely for my own use.
- Layout the kit you’ll need – readily available just adjacent to the toilet.
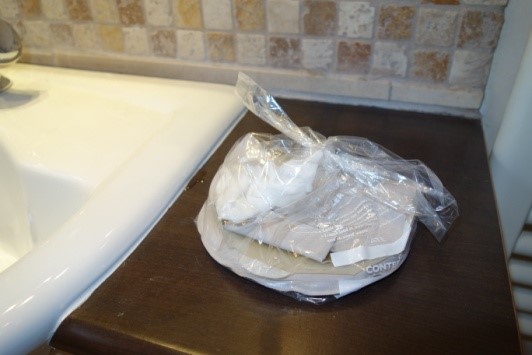
Find a spacious shelf or surface area near the toilet to lay out an additional kit that contains all the essentials you’ll need to empty or indeed to change the ileostomy bag. Make sure that you organize and lay out all the necessary tools in a way that they are readily available to use in case of potential accidents and emergencies. I speak from experience that doing so does indeed work. The kit I have readily at hand for emptying my bag includes:
- An extra toilet roll with four pieces of two sheets ready on the shelf.
- A packet of unscented baby wet wipes with one sheet out of the packet and ready to use.
- Hands-free soap dispenser – ready at the sink.
- Alcoholic hand disinfectant in another hands-free dispenser – provided by the hospital.
- A bathroom cleaner spray, toilet cleaning gel and bleach to keep the toilet spotless.
- The ileostomy bag changing kit and a spare bag cut to size, ready for accidents and emergencies.
- A foot paddle-operated waste bin to dispose of wipes, used bag, toilet paper etc.
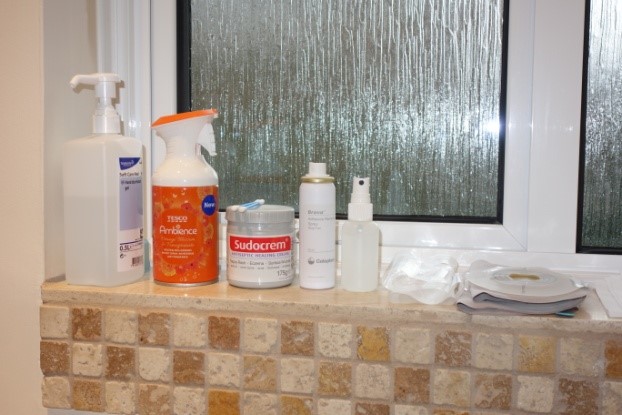

Fig 1: The changing kit ready to use Fig 2: The kit for emptying my ileostomy bag.
- Line the toilet bowl with toilet paper
To make the effluent go down the drain easier, use two pieces of toilet paper – one three sheets long and the other two sheets long. Line the insides of the bowl with the toilet paper close to where you might stand near the toilet. Since the effluent tends to stick to the ceramic toilet bowl, it can be difficult to flush it down the drain. But before you put the toilet paper down, flush the toilet once. This wets the bowl and makes it easy to stick the toilet paper and not just slide down.
- Sit or kneel down close to the toilet bowl.
It is highly likely that the effluent that runs out of the bag might splash around the toilet and get on the floor and around the bathroom. In order to keep this contained and under control, you need to unravel and open the bag with the snout pointed down into the bowl. When at home, I sit down on a footstool placed in front of the toilet so I can lean over and place the snout in the bowl. Sitting down gives me more control over the bag. But when I’m away from home, I have found that it is best to fold up a hand towel and place it on the floor in front of the toilet. I can use this towel to rest my right knee while kneeling down and place my left foot up against the toilet. This allows me to lean over and have the snout well within the toilet bowl.
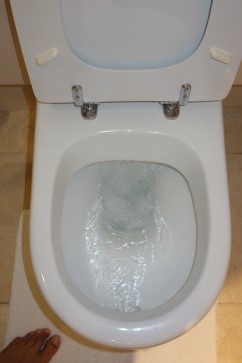
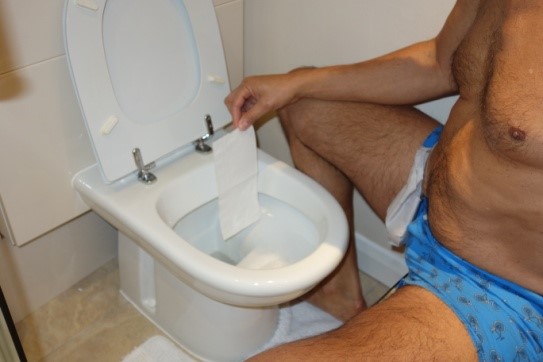
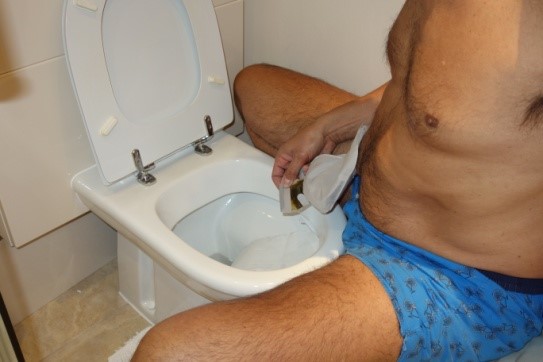
Fig 3, 4 and 5: Work out where your toilet flushes best, line it with toilet paper and sit up close over the bowl.
- Take your trousers off
Take your trousers, skirt or dress off, but keep your boxer shorts/briefs or any other underwear on. If you’re wearing anything with long sleeves, roll or pull them up to keep them out of the way and avoid getting them spoiled. This keeps them from getting in the way and getting contaminated from any splashes. It also makes it a lot easier to sit or kneel in front of the toilet bowl. After that, pull your shirt up and tuck it under your chin to have easy access to the bag.
- Undo the Velcro and unravel the snout of the ileostomy bag.
Now, carefully undo the Velcro that holds the last two folds of the snout. Then keeping your fingers out of the way, gently and carefully unravel the snout of the bag directed toward the toilet bowl.
- Point the snout down into the toilet bowl.
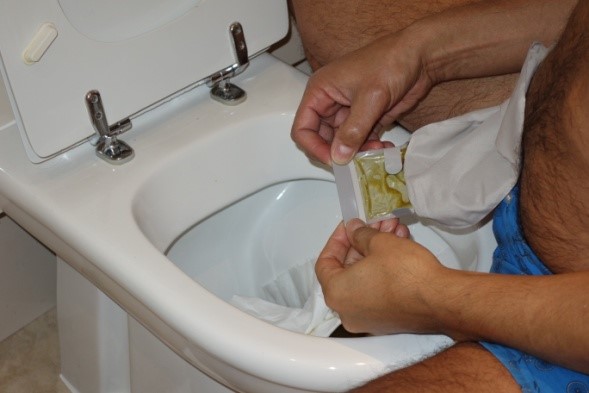
Unravel the folds of the snout of the bag, pointing the snout down into the toilet bowl. The next thing you need to do is have the effluent drip down onto the toilet paper you lined the inside of the toilet with. To prevent splashes, position it so that the effluent drips along the downward sloping part of the toilet rather than on the flat edges. Then using both your hands, gently squeeze the bag starting at the top to milk the contents down toward the bottom. You might struggle a bit if there is air trapped at the top of the bag. This too needs to be milked down towards the snout and out with patience. Remember that the when the bubbles pop out of the snout, they might splash a little bit of the effluent. But you don’t need to worry about that as it is easy to clean it up.
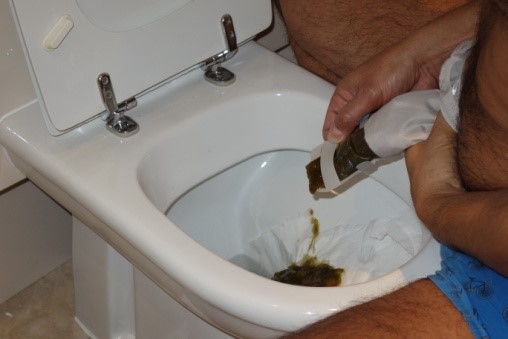
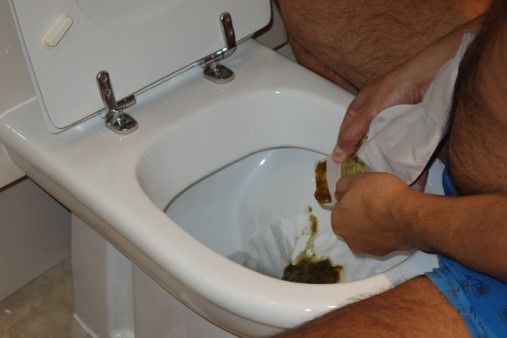
Fig 6: Unravel the snout and point it into the bowl Fig 7: Express the contents from the top
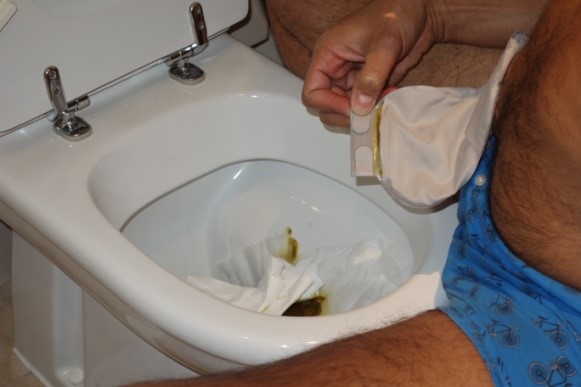
- Use the prepared toilet paper to wipe clean the snout of the ileostomy bag.
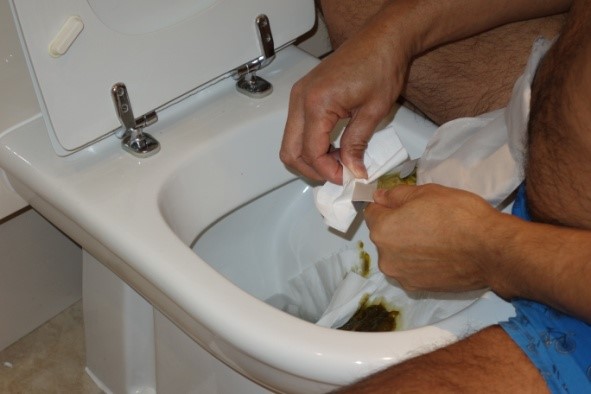
Taking one of the pieces of the pre-torn toilet paper with your right hand, wipe the effluent off the plastic snout from left to right. Follow this step by cleaning the spout once again with the second piece of the pre-torn toilet paper. The majority of the snout should now be fairly clean now, other than the fold between the plastic parts of the snout. To get to those, lift the snout upwards into a vertical position so that more effluent from the bag does not leak out onto the cleaned surface.
In this vertical position, use another piece of toilet paper to wipe the snout clean once again, in a left to right direction and then drop the soiled toilet paper into the toilet bowl. Then taking the wet-wipe in your right hand, wipe the fingers of your right hand before using it to finally clean out the snout of the bag, both on the front and back. You can fold over and use the clean sides of the wet wipe again to clean the fingers of your left hand. Then place the toilet on a shelf in a waste bag, ready to be disposed of into the lined waste bin.
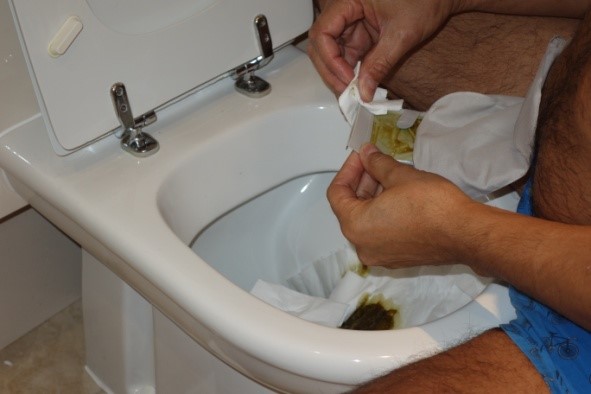
- Carefully close the snout of the ileostomy bag.
Make sure that you pay close attention to and take care while securing closing the snout of the ileostomy bag. First, tightly fold the plastic closure over and over until the little Velcro tabs can be fastened. It is important that you fastened the Velcro tabs tightly and securely to prevent it from unravelling and causing a leakage that can be hard to clean up. I use the final fold of the snout to wrap the bag cover over the folded snout and securing the last fold with the extra bit of Velcro.
Wipe again from left to right
- Dispose of the waste and clean up
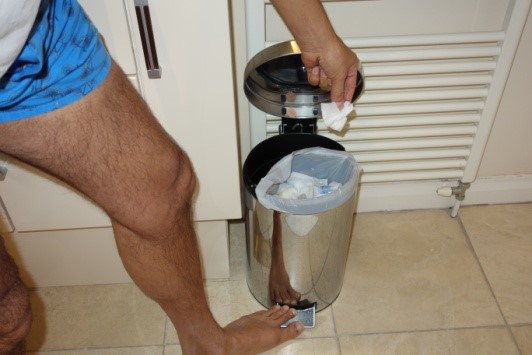
Now that your bag is empty and closed properly. The toilet paper will have been dropped down into the toilet bowl. This can be flushed away. The wet wipe should be thrown away into the foot-operated waste bin. After doing so, wash your hands thoroughly using the soap from the hands-free hand wash dispenser and running your hands under hot water. Then, flush the toilet, which may need two or more flushes. After flushing, rinse your hands once again with the alcoholic hand disinfectant.
- Prepare for the next visit
After getting cleaned up, ensure that you have laid out the kit once again for the next time you need to empty or change your bag once again. You never know what will happen until the next time you have to change or empty your bag. For instance, you may be in a rush or the bag might be almost at the exploding stage. So as a proactive measure, make sure that you are prepared and have everything ready and waiting for your next trip to the bathroom.
Disclaimer: This information is only provided for general and background reading. The information should not be relied upon for treatment. The views provided are not necessarily those of the author or of the website. You should always take advice from your own general practitioner or treating specialist before a treatment is commenced or altered. In individual circumstances liability is not accepted for any reason by my-ileostomy.co.uk